Tutorial: Rainbow Ombré Soap with Bramble Berry's LabColors
I've been wanting to harness the powers of bleeding soap colorants for sometime now, so I decided to snag myself a set of Bramble Berry's LabColors to create a stunning rainbow ombré soap.
This recipe is one of my favorite palm-free soap recipes using babassu oil and coconut oil together. If you don't have babassu (it is pretty expensive), you can replace the babassu oil with mostly coconut oil and a little shea butter.

Rainbow Ombre Soap Recipe & Tutorial with LabColors
It is sized for my Uber Kate mold from Soap Hutch (11" long by 2.5" wide by 4" tall loaf cavity - poured to about 3.25" depth).
You can also use it in a 10" Bramble Berry silicone mold, like most of my other tutorials, but you'll get thinner layers. Or simply resize it using a lye calculator - whatever works for you.
Soap Recipe Used
- 9 ounces Apricot Kernel Oil
- 8 ounces Coconut Oil
- 7 ounces Rice Bran Oil
- 6 ounces Babassu Oil
- 5 ounces Shea Butter
- 3 ounces Castor Oil
- 5.23 ounces Sodium Hydroxide
- 10.62 ounces Distilled Water
I buy most of my soaping oils from Soaper's Choice (Columbus Foods).
Fragrance Oil Blend Used
- 20 grams Energy Fragrance Oil
- 25 grams Kumquat Fragrance Oil
- 15 grams Champagne Fragrance Oil
These fragrance oils are from Bramble Berry, but you can use any fragrances or essential oils your heart desires.
Colorants Used
To get the most out of playing with LabColors, I bought the small set of 12 LabColors, the set includes all of the colors I used in this tutorial and a few more. I do not seem to have any luck with using the Royal Purple LabColor on it's own, so I use a blend of LabColors to hit on purple.
- Red Layer: 1 mL diluted Fuschia LabColor, 1 mL diluted Red LabColor
- Orange Layer: 2 mL diluted Orange LabColor
- Yellow Layer: 2 mL diluted Canary LabColor
- Green Layer: 1 mL diluted Lime LabColor, 1 mL diluted Emerald LabColor
- Blue Layer: 1 mL diluted Brilliant Blue LabColor, 1 mL diluted Blue Mix LabColor
- Purple Layer: 1 mL diluted Royal Purple LabColor, 1 mL diluted Brilliant Blue LabColor, 1 mL diluted Red LabColor
- On top: Gold Sparkle Mica
The Gold Sparkle Mica is also from Bramble Berry, but I sometimes use Sister Golden Hair Surprise from Mad Oils - any gold mica works!
PREP WORK: Weigh out your soaping oils. I like to add my fragrance to my main soap pot so I can't possibly forget it later. Make up your lye solution, too!
If you haven't already, you will need to dilute your LabColors. The usage rates listed above are already diluted LabColors, diluting at the strongest recommended rate (small bottle in 4 ounces of distilled water.) If you need help diluting your LabColors, SoapQueen.com has a great tutorial right over here.
I put each designated layer's LabColor blend in it's individual measuring cup, so I could easily mix the raw soap into the color.

Dilute and measure out your LabColors
GET STARTED: Add your lye solution to your soaping oils. Stick blend until barely emulsified, and then split the batch into six parts: one for each color. Completely mix in the diluted LabColor into your soap using a spatula.

Split the batch and stir in the diluted LabColor
As you'll notice, LabColors are not exactly a "what you see is what you get" kind of colorant. The blues and purples tend to be muted and grey when added to cold process soap, but look great once saponified.
Just make sure to purchase high pH designated LabColors (all the colorants in the small set are high pH safe!)

What the diluted LabColors look like in raw soap
LAYER IT UP: Starting with the purple soap, get pouring! Completely empty each measuring cup as you go, and use a spatula to even out layers and prevent the layer you are pouring from breaking the layer beneath it.
If you want perfectly straight layers, you can stick blend each color to a light to medium trace before pouring and then tap your mold on your work surface to even out each layer. Somewhat straight is good enough for me, though! ;)

Pour each layer of the rainbow soap, starting with purple

Use your spatula to flood fill each layer of the rainbow soap

Smooth our each layer before pouring the next one
FINISH IT UP: Texture the top as you please! For this particular rainbow soap batch, I used a spoon and dragged to the middle from the outside. Spritz the top with rubbing alcohol when it loses the sheen of wet soap, and cover with plastic wrap to help keep the ash monsters away.

Texture the top of the rainbow soap with a spoon
After 24 hours, paint the top of the soap (still in the mold!) with gold mica using a synthetic nylon brush. I like to spritz the top of the soap (after dusting it with mica) with rubbing alcohol to help it stick. If you do that, be careful not to use too much alcohol and let it dry before removing it from the mold.
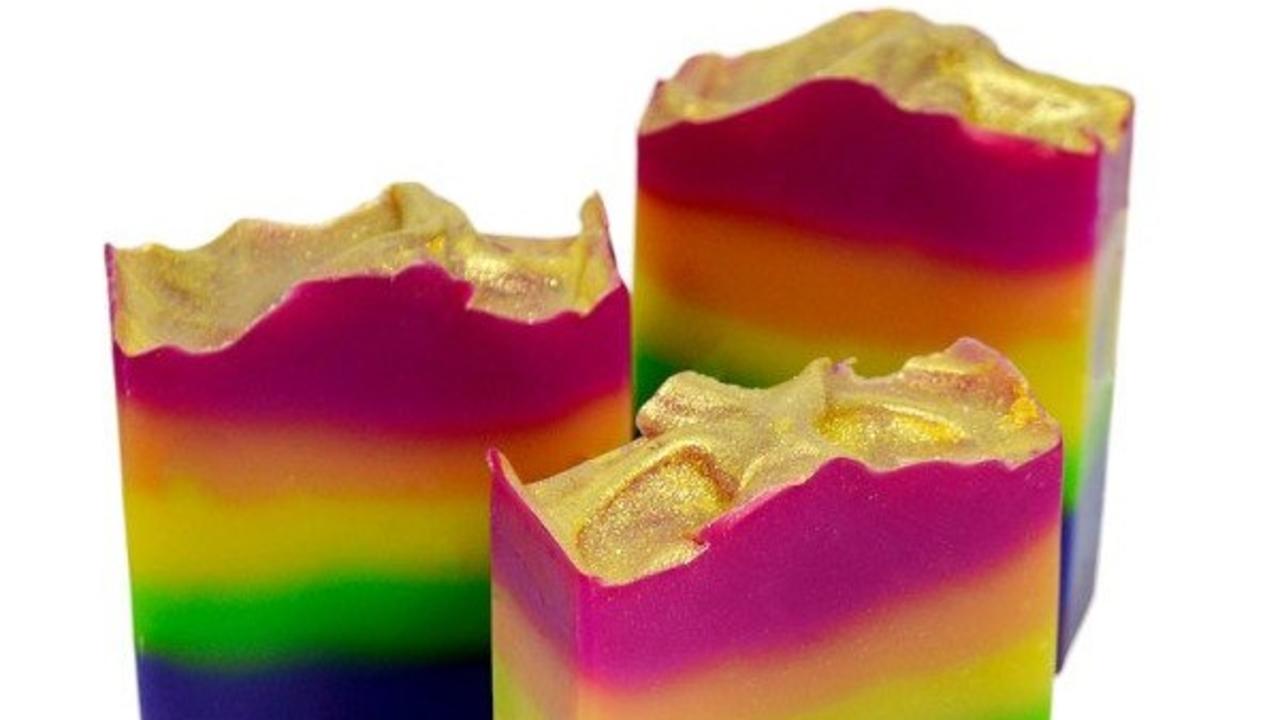
Remove the soap from the mold, slice it up, and give it a good cure. While the soap cures, the LabColors will continue to migrate, creating a lovely ombré effect. Enjoy!

Finished Rainbow Ombre Soap!
This rainbow ombré soap recipe featured in this tutorial is a palm-free and vegan friendly formula. It uses a 7% superfat and a 33% lye solution strength. Feel free to adjust as necessary!
Let me know in the comments if you've used LabColors before and what you thought of them!
Want to snag weekly advice on building a successful soap biz directly in your inbox?
Of course you do! Sign up for our newsletter below for more tips and tricks to make bank in your biz.
