Tutorial: DIY Silicone Soap Mold for Novelty Soaps (+ How to Make Melt and Pour Soap Seashells)
This post is brought to you courtesy of Ariane.
Since I live on an island surrounded by 300 kilometers of white sand beaches, I love to go shell hunting with my kiddos.
My customers can’t get enough of anything that looks, smells or feel like the ocean. So, I decided to create a DIY silicone soap mold from a Northern Moon Snail shell. They are the perfect size to fit in your hand once turned into soap!

To make a DIY silicone soap mold, I found a silicone compound called Poyo Putty. It is just like play dough! After combining the two parts, you have a couple minutes to apply it to the shape you wish to mold. It makes a beautiful custom DIY silicone soap mold for both melt and pour soap and cold process soap!
How to Make a DIY Silicone Soap Mold
These directions will make a single mold, you are welcome to repeat it for as many molds as desired!
What You Need
- 160 grams Poyo Putty Part A
- 8 grams Poyo Putty Part B
- Protective vinyl gloves, goggles and apron
- Precision scale (grams is better than ounces for precision)
- Plastic Film (to protect your scale)
- Pretty Seashell
To make my DIY silicone soap mold, I purchased the Poyo Silicone Putty from SmoothOn.
MAKE YOUR MOLDS: First, cover your scale with plastic film to protect it.
Poyo putty is a two part compound that you mix together. You need 6 parts of Part A to every 1 part of Part B (usage rate of 1:6) by weight.
 Weighing the two parts of the silicone compound to make the DIY silicone soap mold.
Using gloved hands, place 160 grams of Poyo Putty part A on your scale. Using your index finger, push on the putty to create a gap. Add 8 grams of Part B in the dent you created.
Mix and knead the two parts together until the compound is light pink and uniform. This should take about one minute!
 Mold the silicone compound around the shell carefully.
With great care not to create air bubbles, start to apply the putty around the shell. I started at the tip and pressed firmly all the way up to the opening of the shell. Make sure the putty is thick and evenly distributed around the shell!
Press the mold on the counter to create a flat surface so that your mold stands upright once done.
 Finished DIY silicone soap molds made from shells!
Let the compound sit for 30 minutes. After waiting it out, gently twist and push the shell out of the mold! Voilà!
How to Use the DIY Silicone Soap Mold
Now let's use our new molds to create stunning little soaps! This mini tutorial will make 8 sea shell soaps.
To make a realistic looking shell color, I used a combination of lab colors and cosmetic micas.
With the size of my moon shells, each soap weighs approximately 5.8 ounces. To find out how much your DIY silicone soap mold holds, you can place it on your scale, press tare, and then fill it with water. Or after you have made the mold, you can fill it with clear melt & pour and weigh the soap once hardened.
Melt & Pour Seashell Soap Recipe
- 3.5 ounces Clear Melt & Pour soap (New Directions Aromatics)
- 42 ounces White Melt & Pour soap (New Directions Aromatics)
- 1.25 ounces Island Nectar Fragrance Oil (Wholesale Supplies Plus)
Colorants Used
- 2 drops Saffire Blue Lab Color (New Directions Aromatics)
- 2 drops Canary Lab Color (New Directions Aromatics)
- ¼ teaspoon Purple Vibrance Mica (Nurture Soap Supplies)
You will also need:
- Spray Bottle of Rubbing Alcohol
- Thermometer and soaping utensils
GET STARTED: Chop up your melt and pour soap base and melt them over low heat in two small stainless steel stockpots.
Depending on the soap base you are using, melting temperature may vary, so check with your supplier. The bases that I am using work best between 130° and 150° F (54° and 66° C). Never boil melt and pour soap!
![]() Adding colorants to the soap base.
Adding colorants to the soap base.
After the melt and pour melts, add two drops of undiluted canary yellow to the white soap base. Add two drops of Saffire Blue and ¼ teaspoon of Purple Vibrance mica to the clear soap base. Stir and spray rubbing alcohol to help disperse the mica in the soap base.
Add your fragrance oil to the white soap base when the temperature is around 140° F (60° C).
POUR IT: Pour a little of the blue/purple clear soap base into the tip of the mold. Wearing gloves, use your finger to paint the soap around the shell. You can also twirl the mold to help get the soap where you want it.
![]() Pour and brush the clear melt and pour soap around in your DIY silicone soap molds!
Pour and brush the clear melt and pour soap around in your DIY silicone soap molds!
After pouring and brushing the clear soap base, check the temperature of the white melt and pour soap base. It should be around 120° to 140° F (49° to 60° C), depending on your brand.
Spray the blue/purple clear soap base inside the mold with rubbing alcohol to help the melt and pour layers bind.
 Fill the soap molds with the white melt and pour soap base.
Next, pour the white melt and pour base to fill up the mold.
FINISH IT UP: Allow the soaps to harden and cool completely (around 4 to 6 hours) before removing from mold. Push and twist gently to avoid tearing the molds! Shrink wrap and label your soaps accordingly. Make some more!
 Finished seashell soaps made from our DIY silicone soap mold!
These soaps are so lovely and realistic looking, you can almost hear the sound of the waves in the beautiful seashells!
Down here, they fly off the shelves almost faster than we can make them. They are also great gifts or party favors.
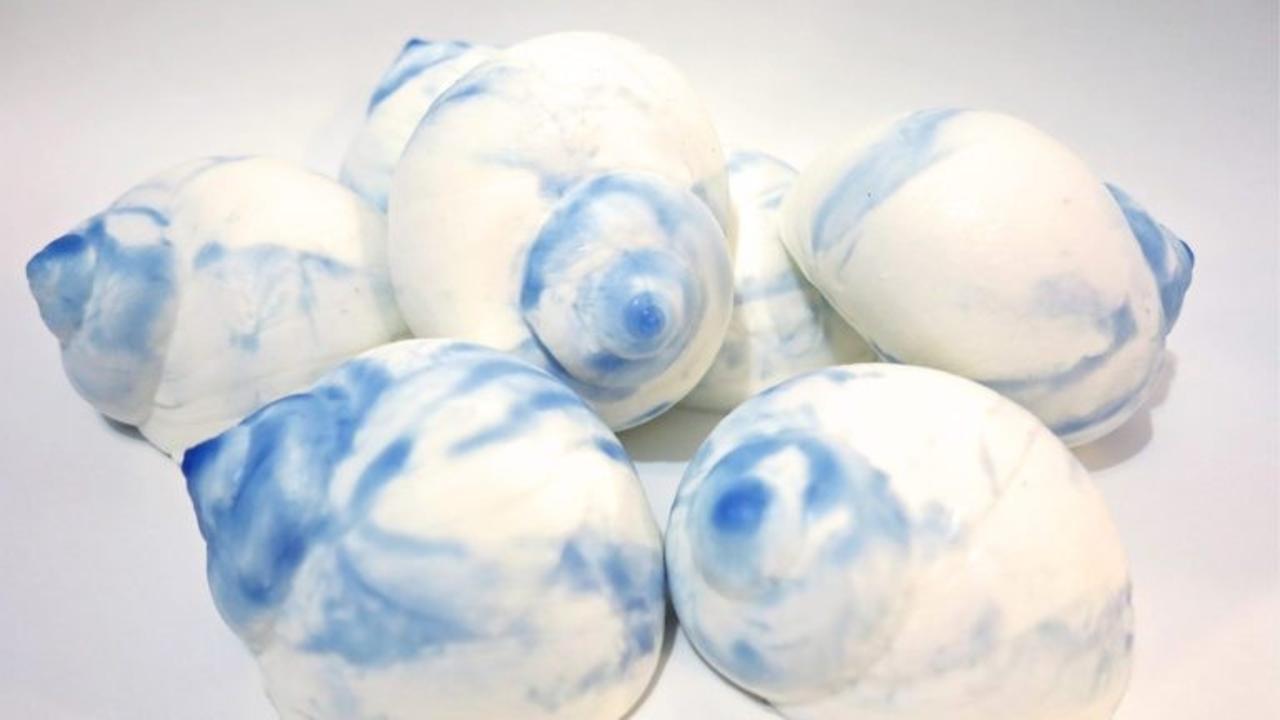
 Another round of seashell soaps with a different color pattern!
Hope you enjoyed this tutorial! Feel free to change the colors and fragrances to make cute little soaps with your own twist!
Want to snag weekly advice on building a successful soap biz directly in your inbox?
Of course you do! Sign up for our newsletter below for more tips and tricks to make bank in your biz.
